SDK for iOS app
Download the iOS Telematics SDK and install it in your environment
Introduction
Here you can find a short video guide, how to add Telematics SDK to your iOS app:
To utilize our telematics environment in your iOS app, you should integrate the Telematics SDK iOS framework into your app.
While you could manually add the framework, we strongly recommend using the CocoaPods dependency manager. If your project already uses other CocoaPods, continue after this first step:
Adding the SDK to your project
Swift Package Manager
in Package.swift add the following:
dependencies: [
  .package(url: "https://github.com/Mobile-Telematics/telematicsSDK-iOS-new-SPM", from: "7.0.3")
],
targets: [
  .target(
    name: "MyProject",
    dependencies: [..., "TelematicsSDK"]
  )
  ...
]
Install CocoaPods
- open a terminal window in the main project folder
- run the following commands to install CocoaPods and create a "Podfile":
$ sudo gem install cocoapods
$ pod init
Add the SDK to your Podfile
- locate 'Podfile' in the main project folder
- using your preferred text editor, add the following line to your Podfile:
pod 'TelematicsSDK', '7.0.3'
- open a terminal window in the main project folder
- run the following commands in a terminal window to re-evaluate the Podfile, and add the RaxelPulse library to your project
$ pod install
Setting up the SDK
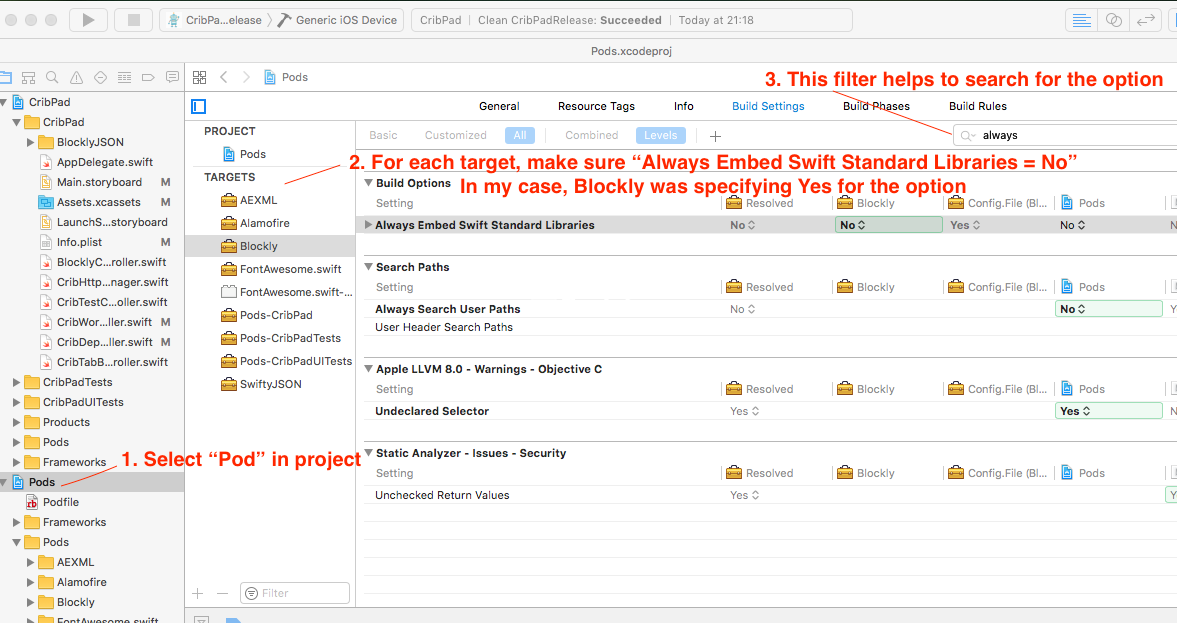
Please check RaxelPulse target in pod Always Embed Swift Standard Libraries: NO

Use this in your project target
Always Embed Swift Standard Libraries: YES
Enable capabilities
Configure the information property list file (Info.plist) with an XML snippet that contains data about your app.
Right-click info.plist, and choose Open As Source Code. Add capabilities for privacy, motion usage etc.
<key>NSLocationAlwaysAndWhenInUseUsageDescription</key>
    <string>Your explanation.</string>
<key>NSLocationAlwaysUsageDescription</key>
    <string>Your explanation.</string>
<key>NSLocationWhenInUseUsageDescription</key>
    <string>Your explanation.</string>
<key>NSMotionUsageDescription</key>
    <string>Your explanation.</string>
Background location
<key>UIBackgroundModes</key>
    <array>
        <string>fetch</string>
        <string>location</string>
        <string>remote-notification</string>
    </array>
Background location request explanation for users and Apple inc.
The most popular explanation is: We're using location services to determine your driving style.
Enable and Schedule Background Tasks
Starting from version 5.12 and new:
We use Background Tasks to improve upload recorded tracks, and send Heartbeats.
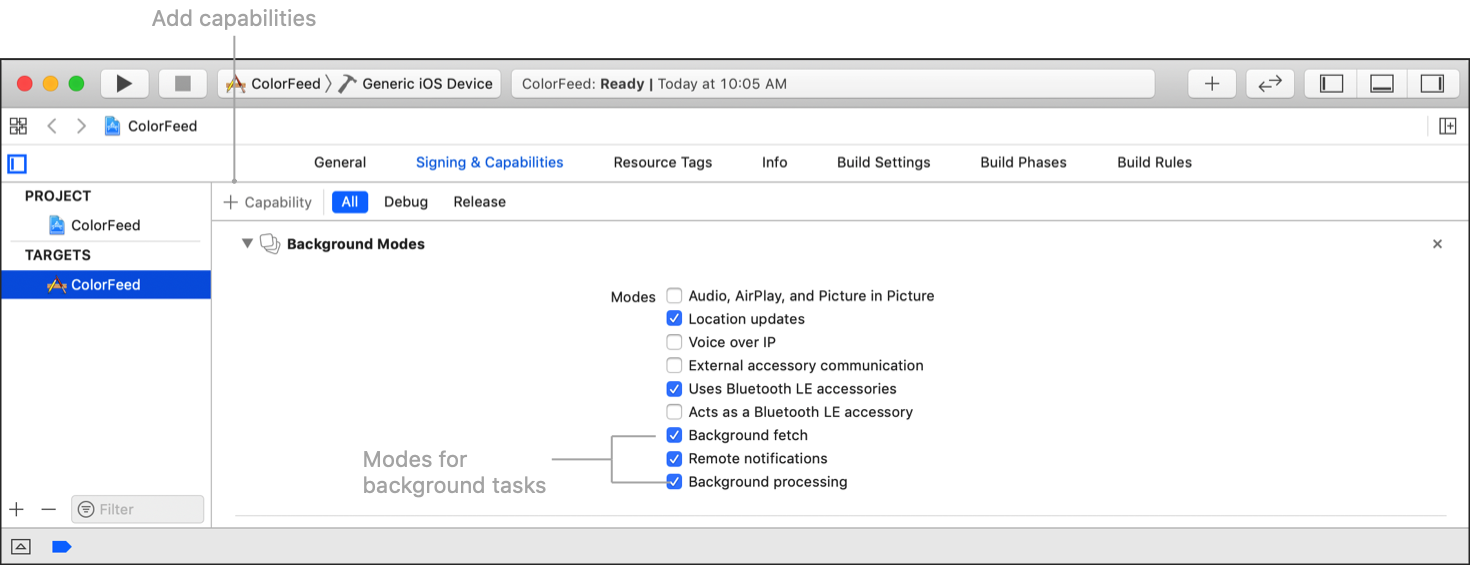
To configure your app to allow background tasks, enable the background capabilities that you need, and then create a list of unique identifiers for each task.
There are two types of background tasks: BGAppRefreshTask and BGProcessingTask. BGAppRefreshTask is for short-duration tasks that expect quick results, such as downloading a stock quote. BGProcessingTask is for tasks that might be time-consuming, such as downloading a large file or synchronizing data. Your app can use one or both of these.
To add the capabilities:
- Open the project editor and select the desired target.
- Click Signing & Capabilities.
- Expand the Background Modes section. If the target doesn’t have a Background Modes section, click + Capability, and then select Background Modes.
- If you’re using
BGAppRefreshTask, select ”Background fetch.“ - If you’re using
BGProcessingTask, select ”Background processing.“

You control which tasks run in the background by registering a list of permitted task identifiers.
To create this list, add the identifiers to the Info.plist file.
- Open the project navigator and select your target.
- Click Info and expand Custom iOS Target Properties.
- Add a new item to the list and choose ”Permitted background task scheduler identifiers,“ which corresponds to the
BGTaskSchedulerPermittedIdentifiersarray. - Add the string for each authorized task identifier as a separate item in the array.
In iOS 13 and later, adding a BGTaskSchedulerPermittedIdentifiers key to the Info.plist disables the application:performFetchWithCompletionHandler: and setMinimumBackgroundFetchInterval: methods.
<key>BGTaskSchedulerPermittedIdentifiers</key>
		<array>
    	<string>sdk.damoov.apprefreshtaskid</string>
    	<string>sdk.damoov.appprocessingtaskid</string>
		</array>
SDK import
import TelematicsSDK
#import <TelematicsSDK/TelematicsSDK.h>
SDK Initialization
First, initialize a new RPEntry class instance with a specified device ID. This method must be the first method calling from RaxelPulse SDK in application didFinishLaunchingWithOptions method.
RPEntry.initializeSDK()
[RPEntry initializeSDK];
App delegate
Important notifications
Note that these notifications are customized, you can use your own text.
Low power mode
@interface AppDelegate () <RPLowPowerModeDelegate> {
    [RPEntry instance].lowPowerModeDelegate = self;
}
class AppDelegate: RPLowPowerModeDelegate {
    RPEntry.instance.lowPowerModeDelegate = self
}
Delegate method:
- (void)lowPowerMode:(BOOL)state {
    if (state) {
        // You can create push in this place and fire about this, as example

        UNMutableNotificationContent *content = [[UNMutableNotificationContent alloc] init];
        content.title = @"Low Power Mode";
        content.body = [NSString stringWithFormat:@"Your trips may be not recorded. Please, follow to Settings=>Battery=>Low Power"];
        UNTimeIntervalNotificationTrigger *trigger = [UNTimeIntervalNotificationTrigger triggerWithTimeInterval:1 repeats:NO];
        UNNotificationRequest *request = [UNNotificationRequest requestWithIdentifier:@"overspeed" content:content trigger:trigger];

        [[UNUserNotificationCenter currentNotificationCenter] addNotificationRequest:request withCompletionHandler:nil];
    }
}
func lowPowerMode(_ state: Bool) {
        if (state) {
            self.showNotification(title: "Low Power Mode", body: "Your trips may be not recorded. Please, follow to Settings=>Battery=>Low Power")
        }
}

func showNotification(title: String, body: String) {
	let content = UNMutableNotificationContent()
        content.title = title
        content.subtitle = body
        content.sound = UNNotificationSound.default

        let trigger = UNTimeIntervalNotificationTrigger(timeInterval: 5, repeats: false)
        let request = UNNotificationRequest(identifier: UUID().uuidString, content: content, trigger: trigger)
        UNUserNotificationCenter.current().add(request)
}
Low accuracy
@interface AppDelegate () <RPAccuracyAuthorizationDelegate> {
    [RPEntry instance].accuracyAuthorizationDelegate = self;
}
class AppDelegate: RPAccuracyAuthorizationDelegate {
    RPEntry.instance.accuracyAuthorizationDelegate = self
}
Delegate method:
- (void)wrongAccuracyAuthorization {
    // You can create push in this place and fire about this, as example

    UNMutableNotificationContent *content = [[UNMutableNotificationContent alloc] init];
    content.title = @"Precise Location is off";
    content.body = [NSString stringWithFormat:@"Your trips may be not recorded. Please, follow to App Settings=>Location=>Precise Location"];
    UNTimeIntervalNotificationTrigger *trigger = [UNTimeIntervalNotificationTrigger triggerWithTimeInterval:1 repeats:NO];
    UNNotificationRequest *request = [UNNotificationRequest requestWithIdentifier:@"overspeed" content:content trigger:trigger];

    [[UNUserNotificationCenter currentNotificationCenter] addNotificationRequest:request withCompletionHandler:nil];

}
func wrongAccuracyAuthorization() {
        self.showNotification(title: "Precise Location is off", body: "Your trips may be not recorded. Please, follow to App Settings=>Location=>Precise Location")
}

func showNotification(title: String, body: String) {
	let content = UNMutableNotificationContent()
        content.title = title
        content.subtitle = body
        content.sound = UNNotificationSound.default

        let trigger = UNTimeIntervalNotificationTrigger(timeInterval: 5, repeats: false)
        let request = UNNotificationRequest(identifier: UUID().uuidString, content: content, trigger: trigger)
        UNUserNotificationCenter.current().add(request)
}
Permissions wizard
Note that the SDK has a built-in Permissions Wizard and a Permissions Dialog that are fully customizable. Wizard for iOS app
Without these permissions, SDK can not be enabled.
Here you can find an example with the correct Permissions Wizard flow:
Permissions in iOS
Setting up the permissions wizard for AppDelegate
- (BOOL)application:(UIApplication *)application didFinishLaunchingWithOptions:(NSDictionary *)launchOptions {
	[RPEntry initializeSDK];
	[[RPEntry instance] application:application didFinishLaunchingWithOptions:launchOptions];
    [[RPPermissionsWizard returnInstance] launchWithFinish:^(BOOL showWizzard) {
    	[RPEntry instance].virtualDeviceToken = @"Please, enter your Token"
        [RPEntry instance].disableTracking = NO;
    }];
}
func application(_ application: UIApplication, didFinishLaunchingWithOptions launchOptions: [UIApplication.LaunchOptionsKey: Any]?) -> Bool {
	RPEntry.initializeSDK()
	let options = launchOptions ?? [:]
    RPEntry.instance.application(application, didFinishLaunchingWithOptions: options)
    RPPermissionsWizard.returnInstance().launch(finish: { _ in
    	RPEntry.instance.virtualDeviceToken = "Please, enter your Token"
    	RPEntry.instance.disableTracking = false
    })
    return true
}
Setting up the permissions wizard for SceneDelegate
- (BOOL)application:(UIApplication *)application didFinishLaunchingWithOptions:(NSDictionary *)launchOptions {
	[RPEntry initializeSDK];
        [RPEntry instance].virtualDeviceToken = @"Please, enter your Token"
	[[RPEntry instance] application:application didFinishLaunchingWithOptions:launchOptions];
        return YES;
}

- (void)scene:(UIScene *)scene willConnectToSession:(UISceneSession *)session options:(UISceneConnectionOptions *)connectionOptions {
    [[RPPermissionsWizard returnInstance] launchWithFinish:^(BOOL showWizzard) {}];
}
func application(_ application: UIApplication, didFinishLaunchingWithOptions launchOptions: [UIApplication.LaunchOptionsKey: Any]?) -> Bool {
	RPEntry.initializeSDK()
	let options = launchOptions ?? [:]
    RPEntry.instance.virtualDeviceToken = "Please, enter your Token"
    RPEntry.instance.application(application, didFinishLaunchingWithOptions: options)
    return true
}

func scene(_ scene: UIScene, willConnectTo session: UISceneSession, options connectionOptions: UIScene.ConnectionOptions) {
    guard let _ = (scene as? UIWindowScene) else { return }
    RPPermissionsWizard.returnInstance().launch(finish: { _ in })
}
App and Scene delegate methods
- (BOOL)application:(UIApplication *)application didFinishLaunchingWithOptions:(NSDictionary *)launchOptions {
    [[RPEntry instance] application:application didFinishLaunchingWithOptions:launchOptions];
    return YES;
}

- (void)application:(UIApplication *)application handleEventsForBackgroundURLSession:(nonnull NSString *)identifier completionHandler:(nonnull void (^)(void))completionHandler {
    [[RPEntry instance] application:application handleEventsForBackgroundURLSession:identifier completionHandler:completionHandler];
}

- (void)applicationDidReceiveMemoryWarning:(UIApplication *)application {
    [[RPEntry instance] applicationDidReceiveMemoryWarning:application];
}

- (void)applicationWillTerminate:(UIApplication *)application {
    [[RPEntry instance] applicationWillTerminate:application];
}

- (void)application:(UIApplication *)application performFetchWithCompletionHandler:(void (^)(UIBackgroundFetchResult))completionHandler {
    [[RPEntry instance] application:application performFetchWithCompletionHandler:^{
        completionHandler(UIBackgroundFetchResultNewData);
    }];
}
func application(_ application: UIApplication, didFinishLaunchingWithOptions launchOptions: [UIApplication.LaunchOptionsKey: Any]?) -> Bool {
    RPEntry.instance.application(application, didFinishLaunchingWithOptions: launchOptions)
    return true
}

func application(_ application: UIApplication, handleEventsForBackgroundURLSession identifier: String, completionHandler: @escaping () -> Void) {
    RPEntry.instance.application(application, handleEventsForBackgroundURLSession: identifier, completionHandler: completionHandler)
}

func applicationDidReceiveMemoryWarning(_ application: UIApplication) {
    RPEntry.instance.applicationDidReceiveMemoryWarning(application)
}

func applicationWillTerminate(_ application: UIApplication) {
    RPEntry.instance.applicationWillTerminate(application)
}

func application(_ application: UIApplication, performFetchWithCompletionHandler completionHandler: @escaping (UIBackgroundFetchResult) -> Void) {
    RPEntry.instance.application(application) {
        completionHandler(.newData)
    }
}
If you use AppDelegate, then you have to implement next methods:
- (void)applicationDidEnterBackground:(UIApplication *)application {
    [[RPEntry instance] applicationDidEnterBackground:application];
}

- (void)applicationWillEnterForeground:(UIApplication *)application {
  [[RPEntry instance] applicationWillEnterForeground:application];
}

- (void)applicationDidBecomeActive:(UIApplication *)application {
    [[RPEntry instance] applicationDidBecomeActive:application];
}
func applicationDidEnterBackground(_ application: UIApplication) {
    RPEntry.instance.applicationDidEnterBackground(application)
}

func applicationWillEnterForeground(_ application: UIApplication) {
    RPEntry.instance.applicationWillEnterForeground(application)
}

func applicationDidBecomeActive(_ application: UIApplication) {
    RPEntry.instance.applicationDidBecomeActive(application)
}
If you use SceneDelegate, then you have to implement next methods:
- (void)sceneDidBecomeActive:(UIScene *)scene {
    [[RPEntry instance] sceneDidBecomeActive:scene];
}
- (void)sceneWillEnterForeground:(UIScene *)scene {
    [[RPEntry instance] sceneWillEnterForeground:scene];
}

- (void)sceneDidEnterBackground:(UIScene *)scene {
    [[RPEntry instance] sceneDidEnterBackground:scene];
}
func sceneDidBecomeActive(_ scene: UIScene) {
    RPEntry.instance.sceneDidBecomeActive(scene)
}

func sceneWillEnterForeground(_ scene: UIScene) {
    RPEntry.instance.sceneWillEnterForeground(scene)
}

func sceneDidEnterBackground(_ scene: UIScene) {
    RPEntry.instance.sceneDidEnterBackground(scene)
}
Enable high-frequency data collection (HF)
HF data is enabled by default.
Enable Accident detection.
Accident detection is disabled by default. You can enable detection.
In order for accident detection to work, you need to enable high-frequency data collection
[[RPEntry instance] enableAccidents:true];
RPEntry.instance.enableAccidents(true)
Change Accident detection sensitivity.
Accident detection sensitivity is normal by default. You can change sensitivity. Sensitivity options which is available to apply: .normal, .sensitive, .tough
[[RPEntry instance] setAccidentDetectionSensitivity:RPAccidentDetectionSensitivityNormal];
RPEntry.instance.accidentDetectionSensitivity = .normal
Enable SDK
Set a DeviceToken to SDK to enable it / SDK Log in.
DeviceToken
Empty or nil DeviceToken is not allowed.
To get a unique deviceToken for each user, you need to
- Use a deviceToken of the test SDK user, created via DataHub earlier (follow this guide
- OR [Setup the SDK login and authorization] (https://docs.telematicssdk.com/docs/set-up-the-sdk-login-and-api-authentication) (via iOS LoginAuth Framework or API)
Log in
[RPEntry instance].virtualDeviceToken = @"VIRTUAL_DEVICE_TOKEN";
[[RPEntry instance] setEnableSdk:true];
RPEntry.instance.virtualDeviceToken = "VIRTUAL_DEVICE_TOKEN"
RPEntry.instance.setEnableSdk(true)
Log out
[[RPEntry instance] logout];
RPEntry.instance.logout()
Update SDK
Regularly update SDK
We regularly make announcement emails for all registered in DataHub users about new critical SDK updates.
Stay in touch with the help of our detailed Changelog: https://docs.telematicssdk.com/changelog/sdk-for-ios
- open a terminal window in the main project folder
- run the following command in a terminal window
$ pod update
Update SDK to a specific version
In order to update to a specific version, you need to write in the PodFile:
pod 'TelematicsSDK', '7.0.3'
where 7.0.3 - number of specific version
Updated about 1 month ago
